400 mm telescope building |
available in multiple languages : |
 |
 |
|
Project definition
In order to refine the type of instrument I wish to build, the specifications were the following :
- Mainly targeted towards deep sky observing (galaxie & nebulae), with the hope to see some more than grey spots on dark background. Planetary observation is less critical with this scope.
- An instrument which doesn't take one hour to be set-up and ready (this is the most frustrating with my current equipment).
- No need for a lorry to transport the stuff...
- I don't have 10 000 bucks to invest in it...
But I also wish to have it for photographical use one day... well the perfect telescope, no more, no less :)
Afterards I started reading several website about ATM, and I "stole" many great ideas by examining buildings from other amateurs. I finally set on the following choices :
- A Newton optical formula for sure, the simplet, the most elegant, the most proven one...
- 400 mm aperture, which is both a maximum for having a "portable" scope, and a minimum for "comfortable" deep sky observing.
- A "not too long" focal, to be able to use the telescope without stepping on anything.
- A "truss" design, well known, than can be dissassembled and stored in boxes for transport (the "Strock" way ;-) ).
- An "evolutionary" approach, so that I can start with the scope for visual use, then to enhance it afterwards...
It will be a Dobson to start with, and I will offer it an equatorial table soon, for visual tracking. For photography, I started thinking about a "horseshoe" type mount, in which I will insert the optical tube. I will end up kind of a "2 in 1" instrument, that will answer all my amateur astronomer willings :).
Choice of optical parts
This has an impact on all the structure, and also the price of the instrument ! May I precise that I didn't get the feeling to make the mirror myself. Then I needed to see what's on the market. I will start with a GSO primary mirror, of 400 mm aperture and a 4,5 focal ratio, resulting in a focal lenght of 1800 mm. This will allow to start at a low level with a cheap optical piece (under $1000), and to keep an option to migrate to a better one later on (especially because optical makers to manufacture mirror with the same dimensions).
This formula is quite versatile :
- With a UWAN 28mm eyepiece, the resulting field of view is about 1,3°, which gives an easy access to large objects such as the lagoon or veil nebulae.
- The 4.5 focal ratio is a good balance between aperture, coma and collimation ease. And a 1800 mm focal length will bring back the eyepiece at eye level for someone standing in front of the scope.
- The 400 mm aperture would theoritically allow to magnify up to 800x. Practically I don't intend to go usually farther than 200 to 250x, and turbulence in my area wouldn't allow to do so anyway.
- In photo use, the 1800 mm focal will give around 0,5° FOV with the Atik 4000, which is a pretty good "all-rounder".
I enventually chose a secondary 88 mm in size, which is rather large for visual use, but will five a full illumination field big enough for the Atik 4000 CCD chip. With a reasonable obstruction of around 22%. The mirror comes from OO UK with a Hilux coating offering 97% of reflectivity.
Update (july 2013) : I finally decided to go for an optical set from Mirro-Sphere. Mirror got there last month and I could fully enjoy using it. The change is real, and is especially visible on diffusion. Stars are tack sharp and less "blurry" than before, and contrast is enhanced on diffuse objects. Secondary mirror has also been replaced, in order to get a homogeneous system. Another advantage is the mirror material (suprax), which has a smaller thermal coefficient, and is mechanically more homogeneous, which makes it a bit less sensitive to temperature variations. In other words, I can use the telescope more rapidly after assembly, without having a completely blurred image in the beginning of an observing session.
An other interesting side note, is the fact that I had to review my collimation procedure with this mirror, and I greatly improved it. Now that the optical train is of great quality, the effect of a less that perfect collimation appears more visible than before, and one can quicly realise that this class of optics can't be used properly without a neat collimation? This is especially felt when obsering planets, and I must say I re-discovered Mars in the telescope since then. A litle advice to enthousiasts... :)
Structure design
Better than drawing, 20th century brought CAD to us. Better use it. All the structure was drawn on the computer, so I can "see" the components assembly, which avoids many design errors. The key points of the final structure are :
- A pripary case of "mirror box" kind, ultra-thin (50 x 50 x11 cm), with a 18 point mirror cell and a "Strock" style collimation system. This is compact, lightweight, elegant... I widely got inspired with this design, which appeared simply wonderful :).
- A structure made of aluminum tubes (20 mm diameter). As a short story, these tubes come from a local store and are curtain rods, costing around $6 per item :-).
- Oversized rocker altitude bearings (400 mm radius) allowing to lower the optical tube and reach the center of gravity without requiring counterweights (!). As a bonus, I can use the scope without a stepladder...
- A secondary cage of "mono ring" type, to limit size, but made of 15 mm plywood for stiffness.
- A spider inspired from Serge Bertorello design, but also from this design, but adapted to my needs.
- Assembly and tuning of the components is entirely done with knobs (no screwdriver), with a "low profile" knurled knob custom system, which give the stiffness to the truss structure.
Mirror cell design was defined and checked with the plop software, to have a good balance of support points under the mirror. After having tested 18 and 27 points designs, I reverted to 18 points (3 x 2 x 3), which is more than enough and simpler to manufacture...
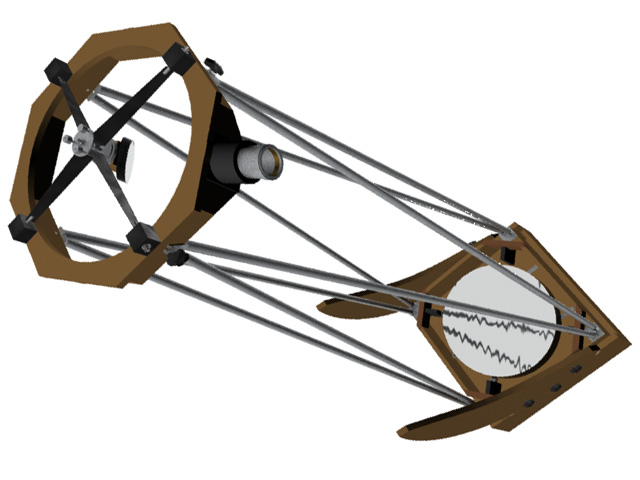 the initial design the initial design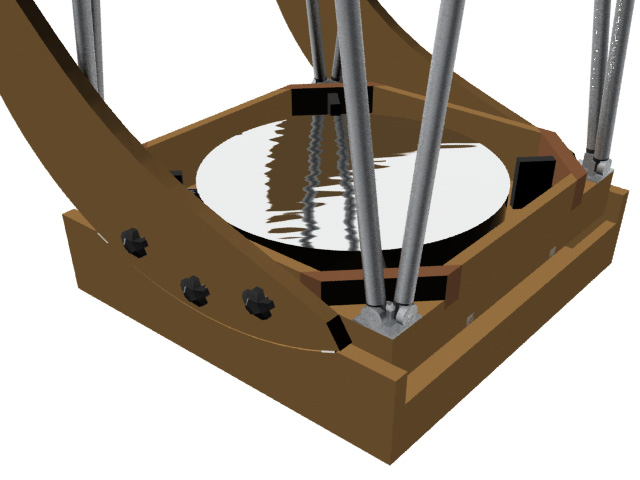 Primary structure Primary structure Secondary structure Secondary structure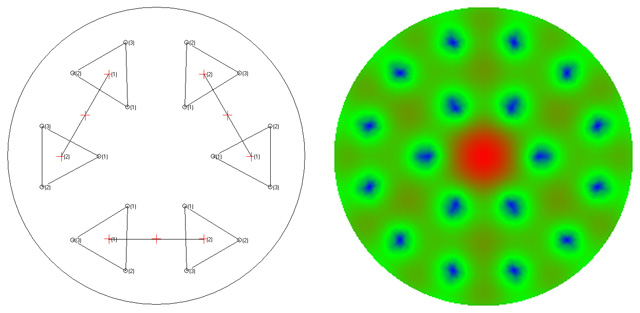 PLOP simulation PLOP simulation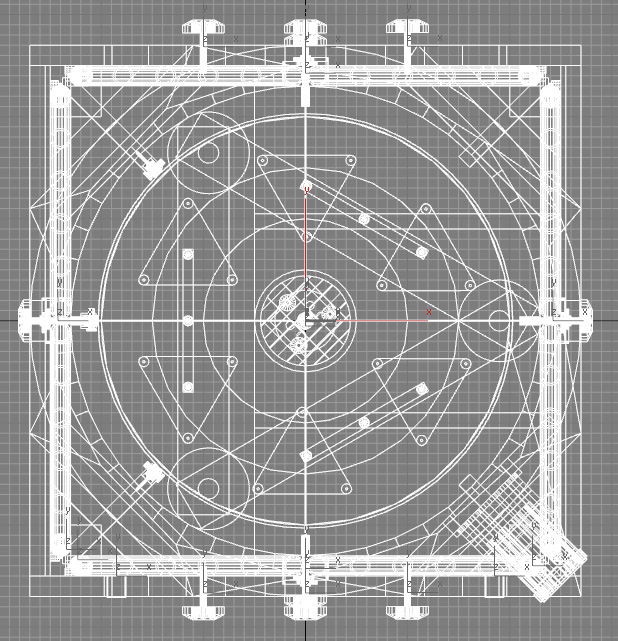 Component alignment, both for mounting and storage Component alignment, both for mounting and storage
Next : Making of the primary case
retour en haut | retour à l'accueil
|
